
Preparing for Painting
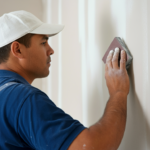
including sanding, is crucial for achieving a smooth and long-lasting paint finish in New York Boroughs.
Priming
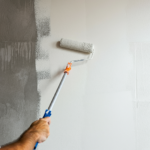
Painting
Tips and Tricks
-
Use a high-quality paint specifically designed for your surface type
-
Choose a paint with a low VOC (volatile organic compound) for better indoor air quality
-
Consider using a semi-gloss paint for high-traffic areas
-
Don’t skip the prep work – if there’s flaking or peeling, it needs to be sanded off and primed
-
Use a paint tray liner for easy clean-up
-
Don’t use tape – instead, cut in neatly with a brush and go slowly

FAQs
Q: Do I need to prime my walls before painting?
A: Yes, priming is an essential step in the painting process, especially if you’re painting over a dark or bold color. For example, if you’re painting a wall that was previously painted red, you’ll need to prime it first to ensure that the new paint adheres properly.
Scenario: Sarah wants to paint her living room walls a light gray color, but the walls are currently painted a dark blue. She primes the walls first to ensure that the new paint adheres properly and to prevent the dark blue color from showing through.
Q: What type of paint should I use for my interior walls?
A: Choose a high-quality paint specifically designed for interior use, such as latex or oil-based. For example, if you’re painting a bedroom, you may want to choose a paint with a low VOC to ensure better indoor air quality.
Scenario: Mark wants to paint his bedroom walls a soothing green color. He chooses a low-VOC latex paint to ensure that the paint doesn’t emit harsh fumes and to promote better indoor air quality.
Q: How many coats of paint should I apply?
A: Follow the manufacturer’s instructions for recommended coats, but typically 2-3 coats are sufficient. For example, if you’re painting a wall with a dark color, you may need to apply multiple coats to achieve the desired color.
Scenario: Emily wants to paint her kitchen walls a bright yellow color. She applies two coats of paint, allowing the first coat to dry completely before applying the second coat.
Q: Can I paint over existing paint?
A: Yes, but make sure the existing paint is in good condition and not peeling or flaking. For example, if the existing paint is chipped or cracked, you’ll need to sand it down and prime it before painting.
Scenario: David wants to paint his living room walls a new color, but the existing paint is chipped and cracked. He sands down the existing paint and primes it before applying a new coat of paint.
Q: What is the best way to clean up paint spills?
A: Use a paint tray liner and clean up spills immediately with soap and water. For example, if you spill paint on the floor, clean it up immediately to prevent it from drying and becoming difficult to remove.
Scenario: Rachel spills paint on her hardwood floor while painting her bedroom walls. She cleans it up immediately with soap and water to prevent it from drying and becoming difficult to remove.
Additional Resources
Painting Techniques
-
Cutting in: Use a brush to paint the edges and corners of a room, where a roller can’t reach.
-
Rolling: Use a roller to paint large areas, working in sections to maintain even coverage.
-
Stippling: Use a brush to create a textured, stippled effect by applying small dots of paint to the surface.
-
Ragging: Use a rag to create a soft, mottled effect by applying paint to the surface and then wiping it off with a rag.

Painting Tools and Materials
-
Paint: Choose a high-quality paint specifically designed for your surface type (latex, oil-based, etc.).
-
Primer: Use a primer to create a smooth, even surface for painting.
-
Brushes: Use high-quality brushes to apply paint to edges, corners, and small areas.
-
Rollers: Use rollers to apply paint to large areas.
-
Paint tray: Use a paint tray to hold and transport paint and roller.
-
Drop cloths: Use drop cloths to protect floors and furniture from paint spills.
Safety Precautions
-
Wear protective gear: Wear gloves, safety glasses, and a mask to protect yourself from paint fumes and spills.
-
Use proper ventilation: Open windows and doors to ensure good ventilation and prevent paint fumes from building up.
-
Avoid electrical hazards: Avoid painting near electrical outlets or switches, and use a ladder or step stool to reach high areas.
Painting Techniques for Different Surfaces
-
Painting drywall: Use a roller to apply paint to drywall, working in sections to maintain even coverage.
-
Painting wood: Use a brush to apply paint to wood surfaces, working in the direction of the wood grain.
-
Painting metal: Use a primer specifically designed for metal surfaces, and then apply paint with a brush or roller.
-
Painting concrete: Use a primer specifically designed for concrete surfaces, and then apply paint with a brush or roller.
Scenario: John wants to paint his living room walls, which are made of drywall. He uses a roller to apply paint to the walls, working in sections to maintain even coverage.
Painting in Different Lighting Conditions
-
Natural light: Paint in natural light to get a true sense of the color.
-
Artificial light: Use a light bulb with a high color temperature (5000K or higher) to get a more accurate sense of the color.
-
Low light: Use a paint with a high LRV (light reflectance value) to make the color appear brighter in low light conditions.
Painting with Different Colors
-
Painting with bold colors: Use a primer to create a smooth, even surface for painting, and then apply multiple coats of paint to achieve the desired color.
-
Painting with pastel colors: Use a paint with a high pigment load to achieve a rich, vibrant color.
-
Painting with metallic colors: Use a primer specifically designed for metallic surfaces, and then apply paint with a brush or roller.
Painting with Different Finishes
-
Painting with a flat finish: Use a roller to apply paint to the surface, working in sections to maintain even coverage.
-
Painting with a semi-gloss finish: Use a brush to apply paint to the surface, working in the direction of the wood grain.
-
Painting with a high-gloss finish: Use a primer specifically designed for high-gloss surfaces, and then apply paint with a brush or roller.
Painting for Different Styles
-
Modern style: Use a bold, bright color to create a modern look.
-
Traditional style: Use a classic, timeless color to create a traditional look.
-
Rustic style: Use a distressed, textured finish to create a rustic look.
-
Coastal style: Use a light, airy color to create a coastal look.
Painting for Different Moods
-
Calming mood: Use a soothing, gentle color to create a calming atmosphere.
-
Energizing mood: Use a bold, bright color to create an energizing atmosphere.
-
Romantic mood: Use a soft, warm color to create a romantic atmosphere.
-
Dramatic mood: Use a dark, rich color to create a dramatic atmosphere.
Painting for Different Ages
-
Children’s rooms: Use a bright, cheerful color to create a fun and playful atmosphere.
-
Teenager’s rooms: Use a bold, edgy color to create a cool and trendy atmosphere.
-
Adult’s rooms: Use a sophisticated, elegant color to create a calm and relaxing atmosphere.
-
Senior’s rooms: Use a soothing, gentle color to create a comfortable and familiar atmosphere.
Painting for Different Personality Types
-
Introverted personality: Use a soothing, gentle color to create a calm and relaxing atmosphere.
-
Extroverted personality: Use a bold, bright color to create an energizing and stimulating atmosphere.
-
Creative personality: Use a unique, expressive color to create a fun and inspiring atmosphere.
-
Analytical personality: Use a logical, systematic color to create a calm and organized atmosphere.